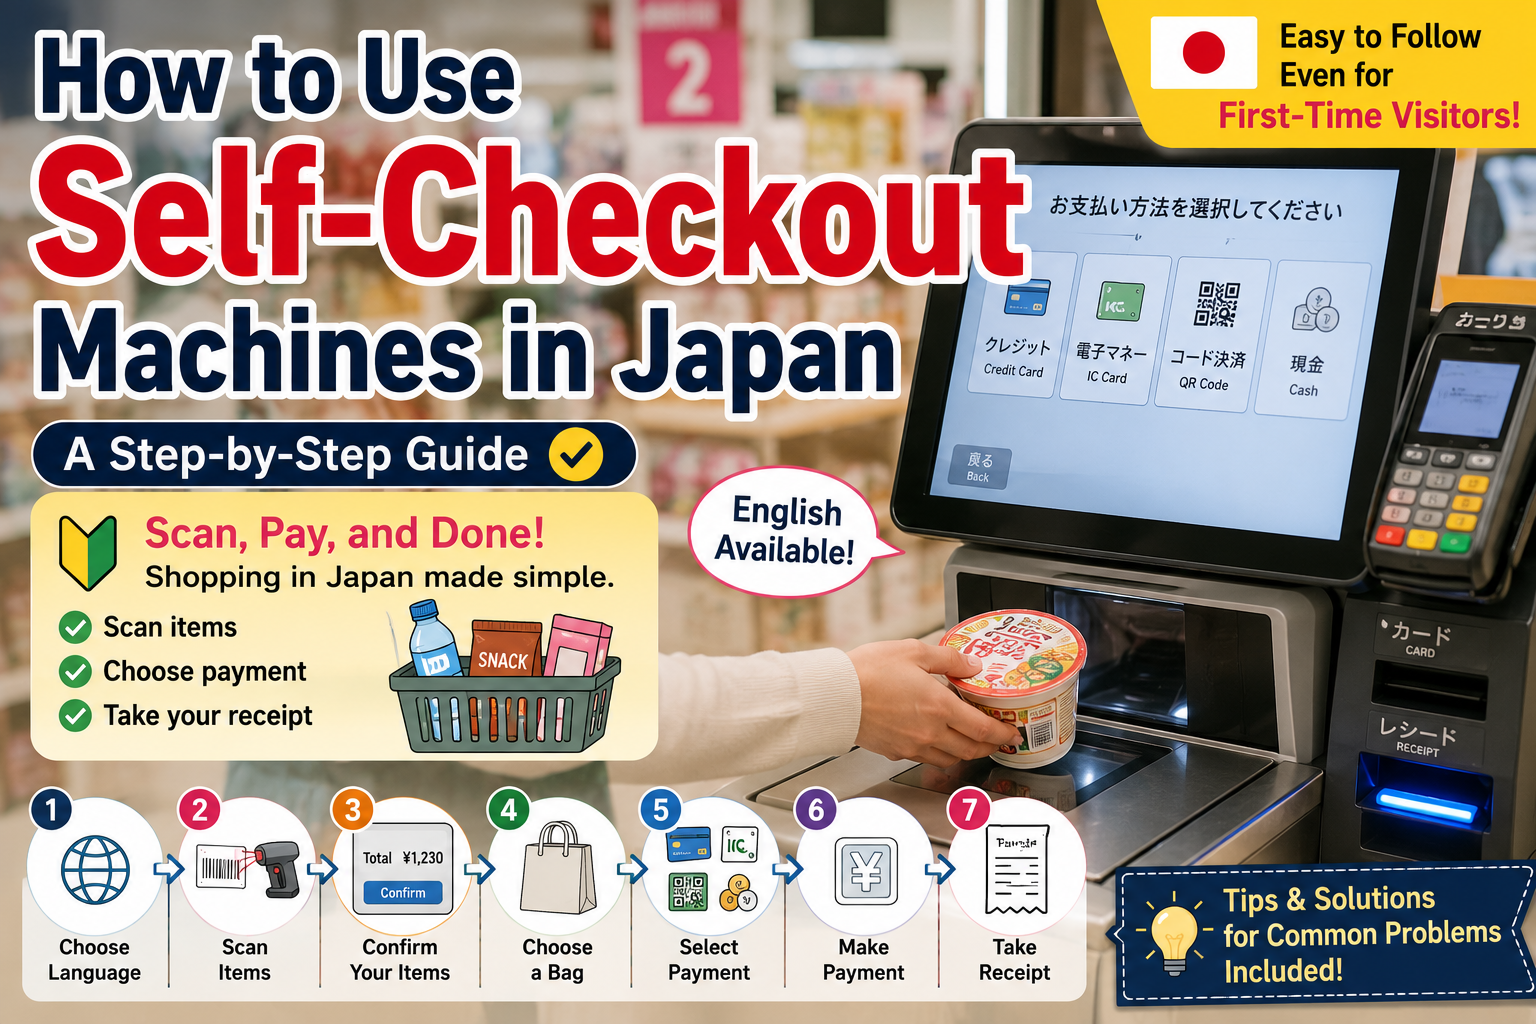
How to Use Self-Checkout Machines in Japan
A Step-by-Step Guide for First-Time Visitors
Self-checkout machines are becoming increasingly common in Japan.
You may find them at:
- Supermarkets
- Convenience stores
- 100-yen shops such as DAISO
- Clothing stores
- Drugstores
- Electronics stores
At first, a Japanese self-checkout machine can look intimidating.
The screen may be in Japanese, the machine may ask several questions, and you may not know where to place your items.
The good news is that most machines follow a similar process.
This guide explains how Japanese self-checkout works, what each step means, and what to do if you need help.
What Is Self-Checkout in Japan?
A self-checkout machine allows customers to scan products and complete payment without a cashier handling the entire transaction.
However, not all Japanese self-checkout systems work in exactly the same way.
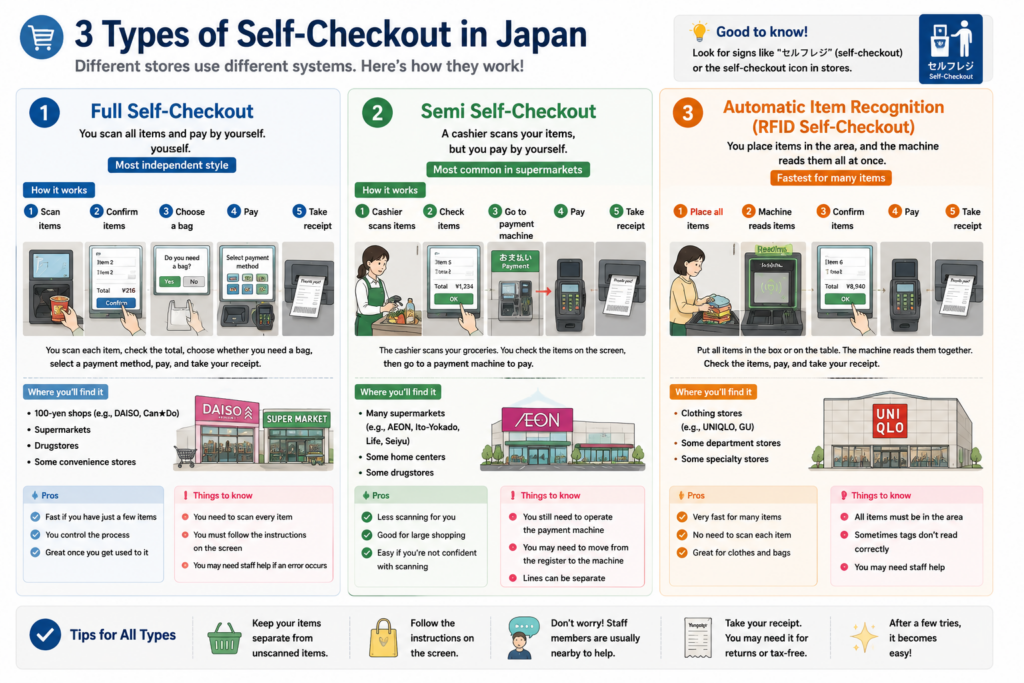
There are three main types.
Full Self-Checkout
You scan every item and pay by yourself.
This type is common at:
- DAISO
- Supermarkets
- Drugstores
- Some convenience stores
Semi-Self-Checkout
A cashier scans your items, but you complete the payment at a separate machine.
This system is especially common in Japanese supermarkets.
For example, AEON has expanded semi-self-checkout systems in which staff register the products while customers complete payment themselves.
Automatic Item Recognition
Some clothing stores use RFID technology.
Instead of scanning each barcode, you place several items into a designated area, and the machine recognizes them simultaneously.
RFID systems use radio waves to read multiple product tags at once, unlike traditional barcode scanners that usually require one-by-one scanning.
Are English Instructions Available?
Many self-checkout machines in major cities and tourist areas provide an English-language option.
Look for buttons such as:
- English
- Language
- 言語
- 日本語 / English
The language button is often shown:
- In the top corner of the screen
- On the welcome screen
- Before you begin scanning
However, English is not guaranteed at every store.
Smaller branches or older machines may operate only in Japanese.
If you cannot find the language option, you can usually follow the icons or ask a nearby staff member.
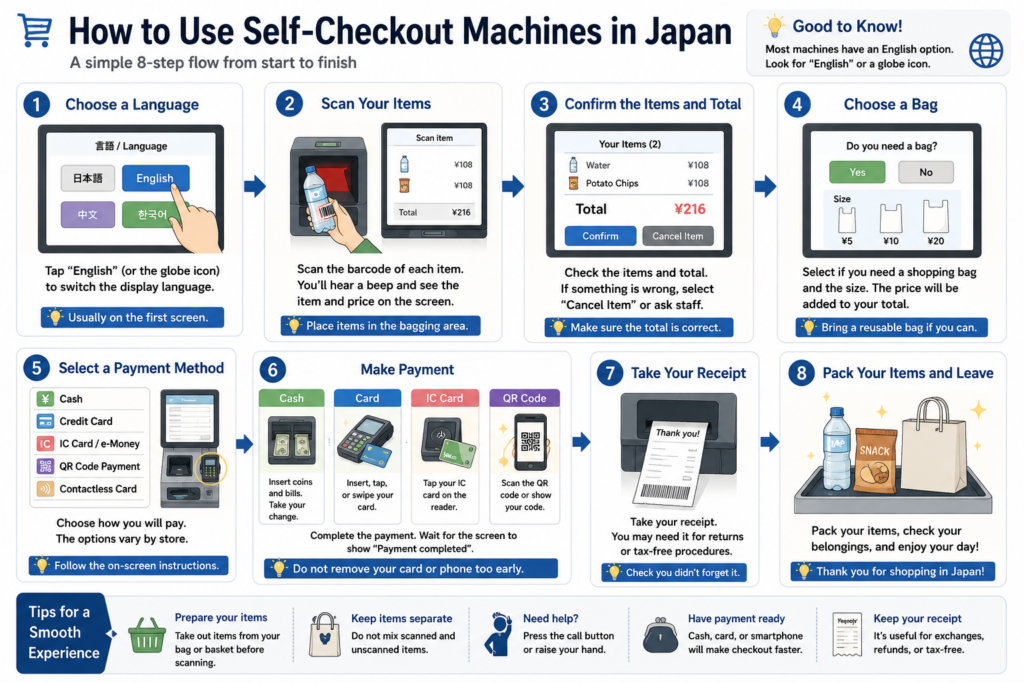
Step 1: Choose a Language
Before scanning anything, check whether the machine offers an English display.
Select:
English
The instructions, payment options, and error messages should then appear in English.
Some machines may also offer:
- Chinese
- Korean
- Other languages
If the transaction has already started in Japanese, look for a globe icon or a button marked:
言語
This means “language.”
Step 2: Scan Your Items
Find the barcode on each product and hold it in front of the scanner.
You may hear a beep when the item has been registered.
The product name and price should appear on the screen.
After scanning an item, place it in the designated bagging area.
Continue until every item has been scanned.
Important Tips
- Scan each product only once.
- Check the screen after each beep.
- Keep scanned and unscanned items separate.
- Do not remove items from the bagging area unless instructed.
Some machines use weight sensors to confirm that the scanned item has been placed in the correct area.
If the machine detects an unexpected weight, it may pause and ask for staff assistance.
Step 3: Check the Items and Total
Before continuing, review the screen carefully.
Confirm:
- The number of items
- Each product price
- The total amount
- Whether any item was scanned twice
If something is wrong, look for:
- Cancel
- Remove Item
- Back
- やめる
- 取消
Depending on the machine, you may need a staff member to remove an incorrectly scanned item.
Do not worry if this happens.
Staff members are usually monitoring several self-checkout machines and can correct the issue quickly.
Step 4: Choose Whether You Need a Shopping Bag
Plastic shopping bags are usually sold separately in Japan.
The machine may ask:
Do you need a bag?
You may see options such as:
- Yes
- No
- Small
- Medium
- Large
If you select a bag, the price will be added to your total.
Some machines require you to scan the barcode printed on the bag itself.
Others add the bag automatically after you select the size.
Bringing a reusable bag is convenient, especially if you plan to shop several times during your trip.
Step 5: Select Your Payment Method
The available payment methods depend on the store.
Common options include:
| Payment method | Typical screen label |
|---|---|
| Cash | Cash / 現金 |
| Credit card | Credit Card / クレジットカード |
| IC card | Electronic Money / 交通系IC |
| QR payment | QR Code / コード決済 |
| Contactless card | Contactless / タッチ決済 |
DAISO’s official store search allows users to filter branches according to services such as credit cards, electronic money, and barcode payments, which shows that available payment methods can differ by location.
DAISO has also introduced several QR-code payment services across many stores, but availability still varies by branch and by the payment infrastructure used at that location.
Cash
Select:
Cash
Insert coins and banknotes into the appropriate slots.
The machine will calculate and return your change automatically.
Credit or Debit Card
Select:
Credit Card
Then follow the instructions on the card terminal.
You may be asked to:
- Insert the card
- Tap the card
- Enter your PIN
- Sign on the screen
IC Card
Transportation IC cards such as Suica and PASMO can often be used at participating stores.
Select the electronic money or IC card option, then touch your card to the reader.
QR-Code Payment
Select the QR-code payment option.
Depending on the system, you may need to:
- Show your app’s barcode to the scanner
- Scan a QR code displayed by the machine
- Confirm the amount in your app
Step 6: Complete the Payment
Follow the instructions shown on the screen or payment terminal.
Do not remove your card or smartphone too early.
Wait until you see a message such as:
Payment completed
or:
Thank you
You may also hear a confirmation sound.
For cash payments, remember to take:
- Your change
- Any returned banknotes
- Your receipt
For card or digital payments, wait for the terminal to confirm that the transaction has been approved.
Step 7: Take Your Receipt
The receipt usually comes out near the bottom or side of the machine.
Take it before leaving.
Keeping the receipt is useful because you may need it for:
- Returns
- Exchanges
- Tax-free procedures
- Checking a payment error
- Confirming what you purchased
Even if you do not normally keep receipts, it is wise to hold onto them during your trip.
Step 8: Pack Your Items and Leave
After payment is complete, place your purchases in:
- Your reusable bag
- A purchased shopping bag
- Your backpack or suitcase
Some stores have a separate packing table.
Others expect you to pack your items directly beside the self-checkout machine.
Before leaving, check that you have:
- All purchased items
- Your wallet
- Your phone
- Your payment card
- Your change
- Your receipt
Common Self-Checkout Problems
Self-checkout machines are convenient, but small problems are common.
Here is what to do.
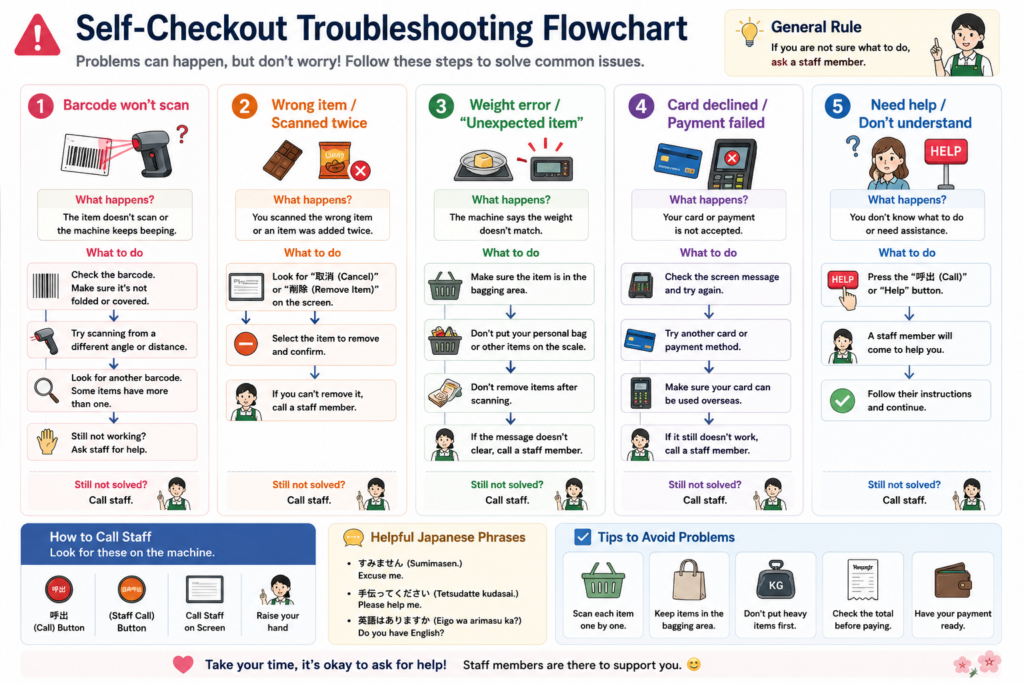
The Barcode Will Not Scan
Try the following:
- Flatten the barcode.
- Move it slowly across the scanner.
- Change the angle.
- Check whether there is another barcode.
- Ask a staff member for help.
Very small products or reflective packaging can sometimes be difficult to scan.
You Scanned an Item Twice
Do not complete the payment.
Look for a remove or cancel button.
If the machine requires staff approval, raise your hand or press the assistance button.
The Machine Says the Weight Is Incorrect
This usually means that the item placed in the bagging area does not match the item the machine expected.
Check that:
- You placed the scanned item in the correct area.
- You did not place your personal bag on the scale.
- You did not remove an item after scanning.
- A child is not touching the bagging area.
If the message remains, ask a staff member to reset the machine.
Your Card Is Declined
Possible reasons include:
- The store does not accept that card.
- Your bank blocked an overseas transaction.
- The card terminal requires insertion instead of tapping.
- A PIN is required.
- The payment network is temporarily unavailable.
Try another card or use cash.
You Cannot Find English
Look for:
- A globe icon
- “English”
- 言語
- Language
If there is no language button, use the icons or ask a staff member.
A simple phrase is:
Sumimasen. Eigo wa arimasu ka?
This means:
“Excuse me. Is English available?”
How Self-Checkout Differs by Store
The general process is similar, but the machines can feel quite different depending on where you shop.
DAISO
At many DAISO stores, customers scan each product individually and then select a payment method.
Payment services can vary considerably by branch, so it is best to check the payment signs near the entrance or checkout area. DAISO’s official store finder lists supported service categories for individual locations.
Supermarkets
Japanese supermarkets may use:
- Full self-checkout
- Semi-self-checkout
- Staff-operated scanning with customer-operated payment
- Smartphone-based shopping systems
Semi-self-checkout is particularly common: staff scan the groceries, then direct customers to a separate payment terminal.
Convenience Stores
Convenience stores may offer:
- A fully self-service register
- A cashier-operated register with self-payment
- Touchscreen payment selection at an attended register
Even when a cashier scans your items, you may still need to select the payment method yourself.
Clothing Stores
Some clothing retailers use RFID-based checkout.
You place all your items into a designated tray or box, and the machine reads multiple product tags simultaneously.
Always confirm the displayed item count before paying.
Useful Japanese Words on the Screen
These words frequently appear on Japanese checkout machines.
| Japanese | English |
|---|---|
| お会計 | Checkout / Payment |
| 現金 | Cash |
| クレジットカード | Credit card |
| 電子マネー | Electronic money |
| 交通系IC | Transportation IC card |
| コード決済 | QR-code payment |
| 袋 | Bag |
| レジ袋 | Shopping bag |
| 必要 | Needed |
| 不要 | Not needed |
| 確認 | Confirm |
| 戻る | Back |
| 取消 | Cancel |
| 領収書 | Receipt |
| 店員を呼ぶ | Call staff |
| お支払い完了 | Payment completed |
You do not need to memorize them all.
Recognizing just a few words—especially 現金, 袋, 確認, and 店員を呼ぶ—can make the process much easier.
Self-Checkout Etiquette in Japan
A few simple habits will help everything run smoothly.
Prepare Before Reaching the Machine
Have your:
- Wallet
- Card
- Smartphone
- Reusable bag
ready before starting.
Do Not Rush
It is better to move slowly and scan each item correctly than to create an error by rushing.
Keep the Area Organized
Place scanned items only in the designated area.
Do not mix them with unscanned products.
Ask for Help When Needed
You are not expected to understand every machine immediately.
Staff assistance is part of the system.
Look for a help button or simply say:
Sumimasen.
That is usually enough to get someone’s attention politely.
Frequently Asked Questions
Can I use self-checkout without speaking Japanese?
Yes.
Many machines have English-language instructions, and the screen icons are often easy to follow.
Do self-checkout machines accept foreign credit cards?
Many do, but acceptance depends on the store and payment terminal.
Carry an alternative payment method, especially cash.
Can I pay with cash?
Many machines accept cash, but some are cashless-only.
Check the signs before joining the line.
Can I use Suica or PASMO?
Often, yes.
Look for an IC card or electronic money symbol.
Availability varies by store.
What should I do if I make a mistake?
Stop before completing payment and ask a staff member.
Do not try to leave with an item that was not registered.
Do I need to scan shopping bags?
Sometimes.
Some stores ask you to select a bag on the screen, while others require you to scan the bag’s barcode.
Can I use coupons or point cards?
It depends on the store and machine.
You may be asked about:
- Membership cards
- Point cards
- Coupons
- Store applications
before scanning or before payment.
If you do not have one, select:
No
or:
Skip
Final Thoughts
Japanese self-checkout machines may look complicated at first, but the basic flow is usually simple:
- Choose a language.
- Scan your items.
- Confirm the total.
- Select a bag.
- Choose a payment method.
- Pay.
- Take your receipt.
- Pack your purchases.
The most important thing to remember is that you do not need to understand everything immediately.
Follow the icons, check the screen carefully, and ask a staff member whenever the machine stops or displays an unfamiliar message.
After using self-checkout once or twice, it will likely become one of the easiest parts of shopping in Japan.
✨ Continue Exploring Japan
Learn more about everyday shopping and payment systems: