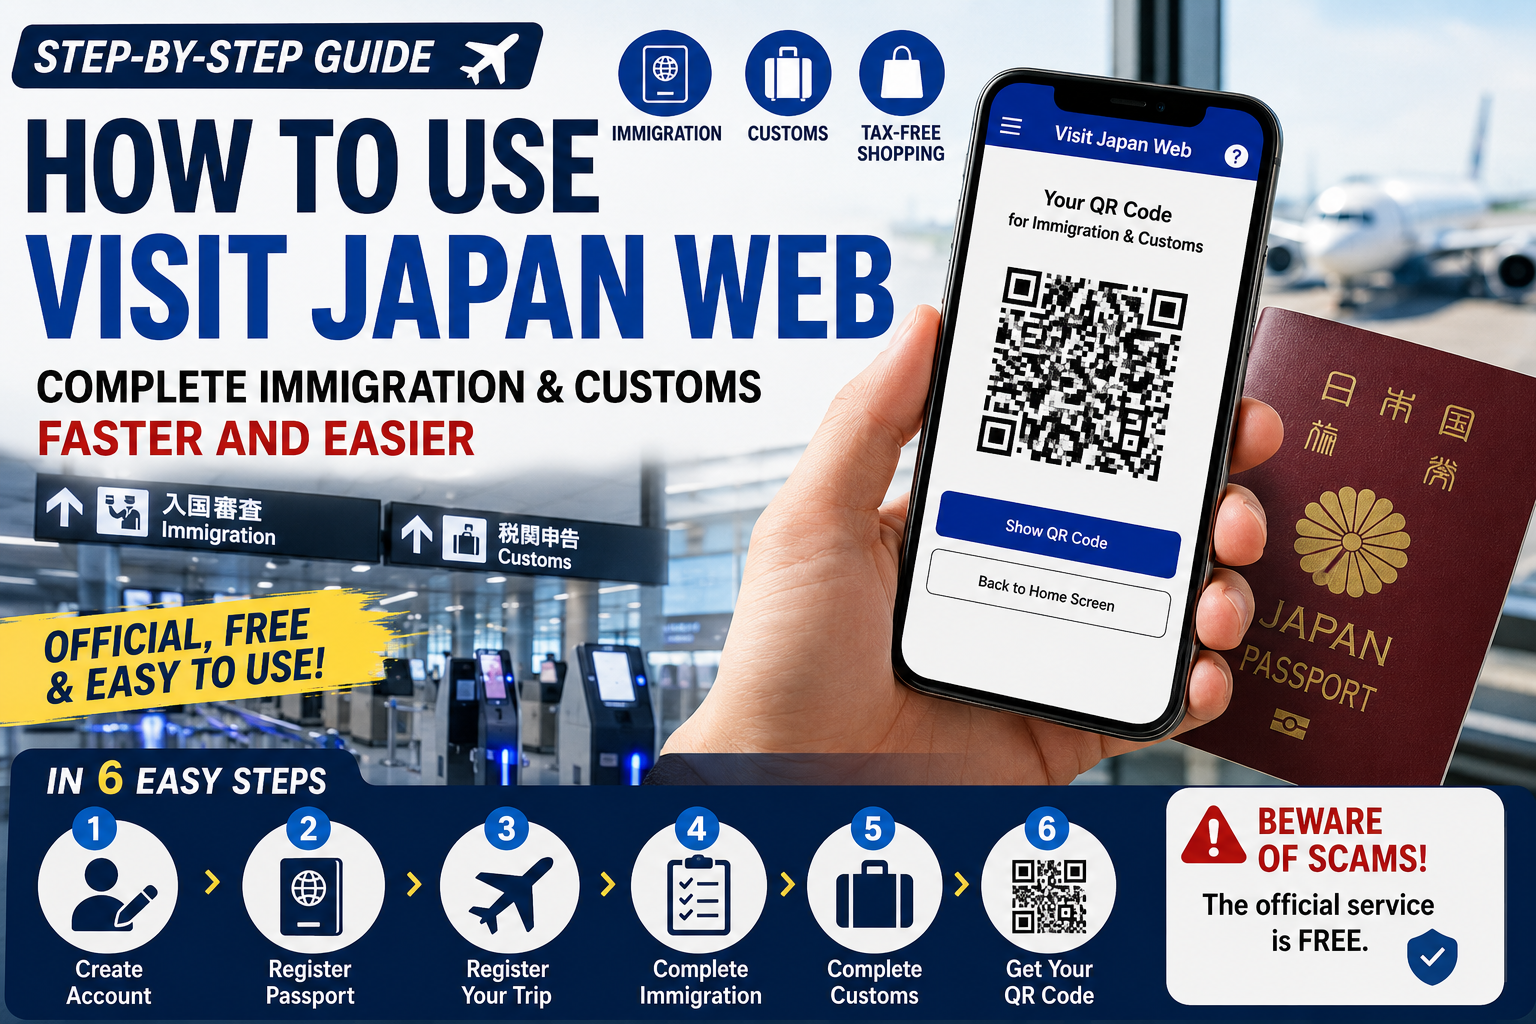
A Complete Guide for Entering Japan
How to Use Visit Japan Web
Before arriving in Japan, international visitors can use Visit Japan Web to enter information required for immigration and customs procedures online.
The service allows travelers to prepare their arrival information before landing, then display a QR code at the airport.
Visit Japan Web is operated by Japan’s Digital Agency and is available free of charge. It also includes an optional tax-free shopping function for eligible visitors.
The system is convenient, but first-time users may still wonder:
- Which information should I register?
- Do I need separate QR codes?
- Can I register my family?
- Where do I scan the code?
- Is Visit Japan Web mandatory?
- How can I identify the official website?
This guide explains the entire process from account creation to leaving the airport.
🇯🇵 Quick Facts
| Item | Details |
|---|---|
| 💰 Cost | Free |
| 📱 App Required | No—use a web browser |
| 🛂 Main Uses | Immigration and customs |
| 📷 What You Need | Passport and travel details |
| 📶 Airport Internet | Save a screenshot as backup |
| 👨👩👧 Family Registration | Accompanying family members can be added |
| ⭐ Difficulty | Easy if completed before departure |
What Is Visit Japan Web?
Visit Japan Web is an official Japanese government service that allows travelers to prepare certain arrival procedures online.
Its main functions are:
- Immigration entry information
- Customs declaration
- QR-code generation
- Tax-free shopping support for eligible visitors
The Immigration Services Agency recommends that foreign visitors submit their Foreigner Entry Record electronically through Visit Japan Web, while Japan Customs recommends using the service for electronic customs declarations.
Visit Japan Web currently handles immigration and customs, not routine COVID-era quarantine registration. Japan’s Ministry of Health states that Visit Japan Web is no longer required for current quarantine procedures.
Is Visit Japan Web Mandatory?
Visit Japan Web is strongly recommended, but it is not the only possible method of completing entry procedures.
Paper forms and staffed procedures remain available in relevant situations. However, completing the information online before arrival can reduce the amount of paperwork you need to complete after landing.
Japan Customs describes electronic declaration through Visit Japan Web as the recommended method rather than a paid or mandatory application service.
For most first-time visitors, registering before departure is the simplest option.
What You Need Before Starting
Prepare the following:
- Your passport
- An email address
- Your flight details
- Your arrival airport
- Your planned address in Japan
- Your hotel name and telephone number
- Information about items you are bringing into Japan
- Details for accompanying family members, when applicable
It is easiest to complete the registration after your flights and first accommodation have been confirmed.
Step 1: Open the Official Visit Japan Web Website
Visit Japan Web works through a browser. You do not need to install a third-party mobile app.
Before entering personal information, confirm that you are using the official service operated by Japan’s Digital Agency.
Important Scam Warning
Japan Customs has identified fake Visit Japan Web sites and private services that request payment to create QR codes.
The official service is free.
You should not be asked to pay:
- A Visit Japan Web registration fee
- A QR-code creation fee
- A customs-processing fee
- An arrival application fee
Japan Customs specifically warns travelers not to provide payment or personal information to unofficial sites impersonating Visit Japan Web.
Step 2: Create an Account
Select the option to create a new account.
You will normally need to:
- Enter your email address.
- Create a password.
- Accept the terms of use.
- Verify your email address.
- Return to Visit Japan Web and sign in.
Use an email address you can access during your trip.
Keep your password somewhere secure because you may need to reopen your QR code after landing.
Step 3: Register Your User Information
After signing in, register the person who will enter Japan.
The official registration flow includes:
- Selecting the category of entry or return
- Registering passport information
- Registering basic personal information
- Entering contact information
The service may allow you to scan the passport information page using your phone camera, or enter the information manually.
Check that the following exactly match your passport:
- Family name
- Given name
- Date of birth
- Nationality
- Passport number
- Passport expiration date
A small spelling or number error can cause problems when the QR code is checked.
Step 4: Add Accompanying Family Members
Travelers can register accompanying family members under the same Visit Japan Web account when appropriate.
This is particularly useful for:
- Young children
- Family members without their own device
- Travelers who need assistance
- Parents managing a family itinerary
However, each traveler still has an individual passport and arrival record.
At airport kiosks, immigration and customs procedures must generally be completed for each traveler individually, including children and other registered family members. Japan Customs states that all group members must complete the required kiosk procedure one by one.
Do not assume that scanning the parent’s QR code completes the procedure for the entire family.
Step 5: Register Your Planned Entry
Create a new arrival plan and enter your trip information.
This may include:
- Arrival date
- Airline
- Flight number
- Departure location
- Arrival airport
- Accommodation address
- Hotel or contact telephone number
Give the trip a simple name, such as:
Japan Trip – October 2026The trip name is only for organizing your own registration.
Hotel Address Tip
Use the address of your first accommodation in Japan.
Copying the address directly from the hotel’s official booking confirmation reduces the risk of entering the wrong postal code or prefecture.
Step 6: Complete the Immigration Information
Open the immigration or Foreigner Entry Record section.
You may be asked about:
- Your purpose of visit
- Your planned length of stay
- Your address in Japan
- Previous visits
- Criminal or immigration history
- Deportation history
- Other entry-related declarations
Answer every question accurately.
Visit Japan Web does not grant permission to enter Japan. It only allows you to submit the required information electronically. The final immigration decision is made by an immigration officer.
Step 7: Complete the Customs Declaration
Every passenger entering Japan must declare their accompanied and unaccompanied articles to customs.
The electronic declaration asks about items such as:
- Alcohol
- Tobacco
- High-value goods
- Commercial goods
- Restricted items
- Cash and other means of payment
- Items sent separately
- Goods exceeding duty-free allowances
Japan Customs recommends completing this declaration through Visit Japan Web. A QR code containing the declaration information is then generated for use after arrival.
Answer honestly, even when you are unsure whether an item must be declared.
Declaring an item does not automatically mean it is prohibited or that duty will be charged. It allows a customs officer to determine the correct procedure.
Step 8: Display Your QR Code
After completing the required sections, Visit Japan Web will display a QR code for your arrival procedure.
Since January 25, 2024, Visit Japan Web has used a unified 2D code for immigration and customs information. Old QR codes generated by the discontinued Customs Declaration App are no longer valid.
Before leaving for the airport:
- Open the QR code once
- Confirm that your registration is complete
- Save a screenshot
- Keep your passport with you
- Make sure your phone has enough battery
A screenshot is useful when airport Wi-Fi or mobile data is slow, although you should also keep access to the live Visit Japan Web account.
What Happens After You Arrive in Japan?
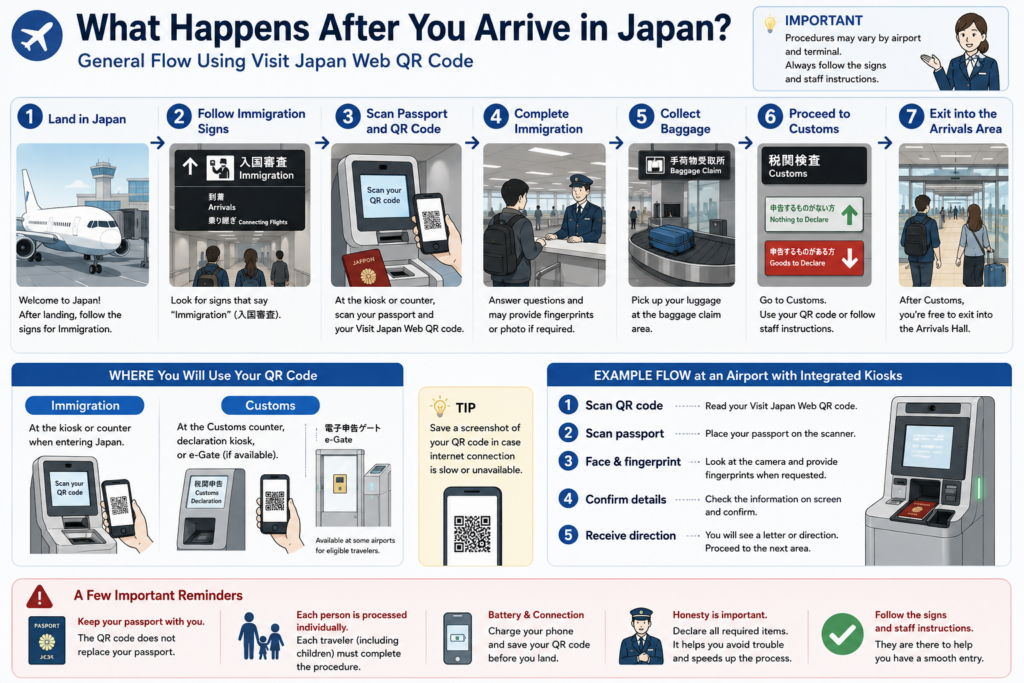
The exact procedure varies by airport and terminal, but the general flow is:
Land in Japan
↓
Follow Immigration Signs
↓
Scan Passport and QR Code
↓
Complete Immigration
↓
Collect Baggage
↓
Proceed to Customs
↓
Use the QR Code or Follow Staff Instructions
↓
Exit into the Arrivals Area
Always follow the signs and instructions at the airport you are using.
Using an Integrated Kiosk
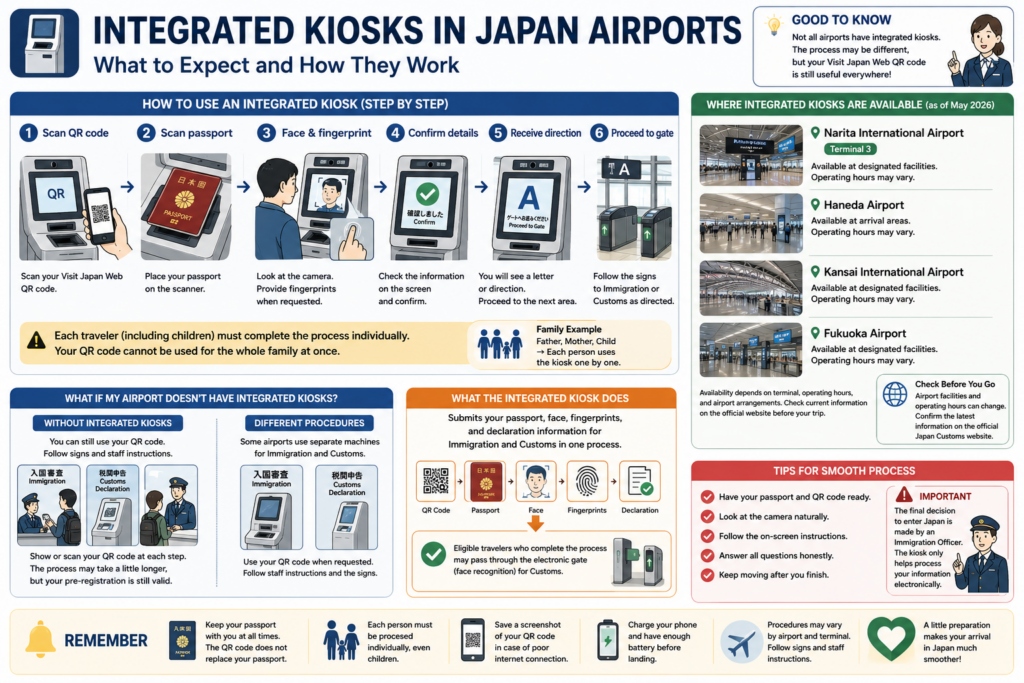
Integrated immigration and customs kiosks are currently used at designated facilities at:
- Narita International Airport Terminal 3
- Haneda Airport
- Kansai International Airport
- Fukuoka Airport
Availability can depend on the terminal, operating hours and current airport arrangements.
At an integrated kiosk, you may be asked to:
- Scan your Visit Japan Web QR code.
- Scan your passport.
- Look at the camera.
- Provide fingerprints when required.
- Follow the instructions on the screen.
- Note the letter or direction displayed at the end.
The kiosk can submit passport, facial and declaration information for immigration and customs in one process. Eligible travelers who complete the procedure and are not selected for further inspection may later pass through an electronic customs gate using facial recognition.
What If My Airport Does Not Use an Integrated Kiosk?
Do not worry.
Visit Japan Web can still be used at airports without the newest combined kiosk system.
Follow airport signs and show or scan your QR code when instructed by:
- Immigration officers
- Customs officers
- Electronic declaration machines
- Airport staff
The physical process may look different, but the information you entered remains useful.
Do I Need Internet Access at the Airport?
It is safer to assume that you may briefly have trouble connecting.
Before boarding your flight:
- Save the QR code as a screenshot
- Charge your phone
- Carry a portable battery
- Keep your login details accessible
- Do not rely entirely on airport Wi-Fi
However, do not delete your Visit Japan Web registration after saving the image. Staff may ask you to reopen or update information.
Can One QR Code Be Used for the Whole Family?
No single scan should be assumed to complete the procedure for everyone.
Even when family members are registered under one account, select and display the correct traveler’s information when that person is processed.
Each traveler should have:
- Their own passport
- Their own registered personal details
- The correct QR information
- Their own customs declaration information where required
At integrated kiosks, each family or group member completes the process individually.
Can I Edit the Information Later?
Visit Japan Web generally allows you to reopen the registered trip and correct information before completing arrival procedures.
Review the registration when any of the following changes:
- Flight number
- Arrival date
- Arrival airport
- Hotel
- Passport
- Accompanying family member
- Customs answers
Do not create multiple duplicate trips unless necessary. Updating the existing planned entry is usually easier to manage.
Visit Japan Web and Tax-Free Shopping
Visit Japan Web also includes a tax-free shopping service for eligible foreign visitors.
The official guide states that eligibility depends on citizenship and immigration status, including qualifying visitors with statuses such as Temporary Visitor, Diplomat or Official.
This function is separate from immigration and customs clearance.
You should still carry your physical passport because stores may need it, and participating retailers may use different verification methods.
Common Visit Japan Web Mistakes
1. Using an Unofficial Website
The official service is free. Do not pay another site to create a QR code.
2. Entering a Nickname
Use your name exactly as it appears in your passport.
3. Registering the Wrong Flight
Enter the flight that physically arrives in Japan, not an earlier connecting flight.
4. Using the Wrong Hotel Address
Enter the first place where you will stay after arrival.
5. Completing Only Immigration
Check that the customs declaration is also complete.
6. Assuming One QR Code Covers Everyone
Each traveler must be correctly registered and processed.
7. Relying Entirely on Airport Wi-Fi
Save the QR code and charge your phone before landing.
8. Hiding Items That May Require Declaration
When uncertain, declare the item and ask a customs officer.
A Simple Pre-Flight Checklist
✅ Before Leaving Home
- Create your official Visit Japan Web account
- Register passport information
- Add accompanying family members
- Register your arrival trip
- Complete immigration information
- Complete the customs declaration
- Check that the QR code appears
- Save a screenshot
- Charge your phone
- Keep your passport in your hand luggage
❌ Do Not
- Pay for Visit Japan Web registration
- Use an unofficial QR-code service
- Enter a nickname
- Register the wrong arriving flight
- Assume one person’s QR code covers the family
- Pack your phone or passport in checked luggage
- Give false customs information
🇯🇵 HONNE JAPAN PICK
Complete Visit Japan Web before traveling to the departure airport, not during the flight or after landing.
The easiest preparation is:
Register your passport, arrival flight, first hotel, immigration information and customs declaration—then save the completed QR code to your phone.
Also bookmark the official service rather than finding it again through a sponsored search result. Japan Customs has specifically warned that fake sites may ask for money or personal information.
FAQ
Is Visit Japan Web free?
Yes. The official Japanese government service is free. Japan Customs does not charge a fee for the electronic arrival declaration.
Is Visit Japan Web an app?
No dedicated app is required. The service is used through a web browser.
Is Visit Japan Web mandatory?
It is recommended for smoother electronic processing, but paper or staffed procedures remain available when necessary.
When should I register?
Complete it after confirming your flight and first accommodation, preferably several days before departure.
Do children need to be registered?
Yes. Children entering Japan need their own arrival information, although a parent may manage their registration as an accompanying family member.
Do I need a separate customs QR code?
Visit Japan Web uses a unified 2D code for immigration and customs information.
Can I use a screenshot?
A screenshot is a useful backup. Keep access to the live account as well in case information must be checked or changed.
Do I still need my passport?
Yes. The QR code does not replace your passport.
Does Visit Japan Web guarantee entry?
No. Immigration officers make the final decision on entry.
Does it include quarantine registration?
Routine COVID-era quarantine registration is no longer required through Visit Japan Web.
Final Thoughts
Visit Japan Web may look complicated because it combines several different arrival procedures in one service.
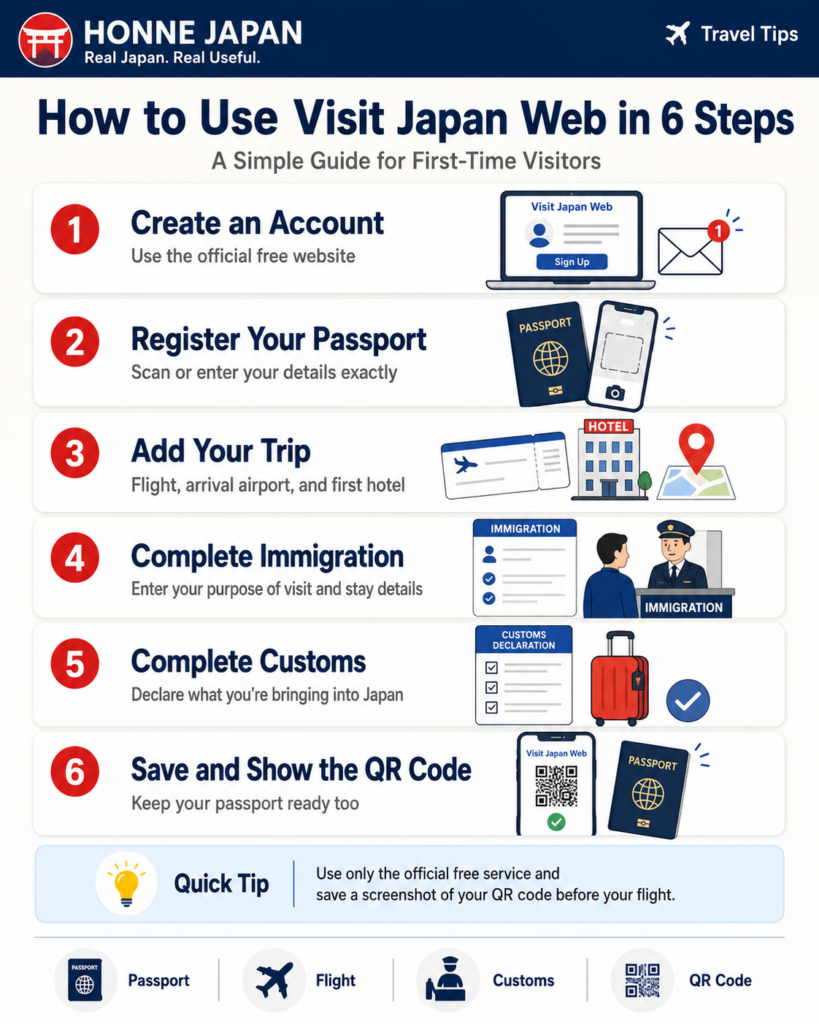
In practice, the process can be reduced to six steps:
- Create an account.
- Register your passport.
- Add your arrival trip.
- Complete immigration information.
- Complete the customs declaration.
- Save and present the QR code.
Completing these steps before departure removes much of the uncertainty after a long international flight.
The most important precautions are simple:
Use only the official free service, enter information exactly as shown in your passport, and keep your QR code and passport ready when you land.
Related Articles
- What to Do at a Japanese Airport
- Can You Bring Medicine into Japan?
- Japan Customs Rules Explained
- SIM Card vs eSIM vs Pocket Wi-Fi
- How Much Cash Should You Bring to Japan?
- How to Use Suica and PASMO in Japan
- How to Ride Trains in Japan